Roaring Tiger: Bold Brand Identity for Small Business Merch
A Designer’s First Impression: Fearless, Clean, and Commercial-Ready
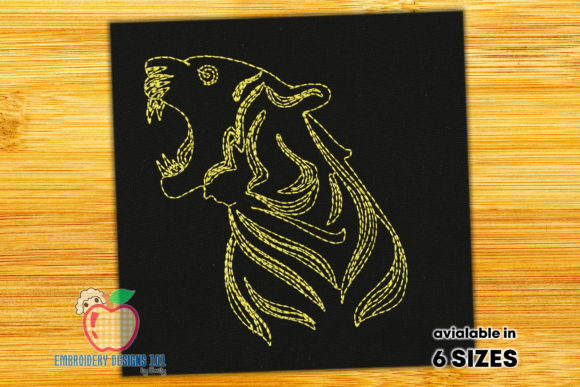
As an embroidery designer who’s digitized and stitched over 2,000 small business projects—from bakery aprons to pet brand caps—I opened Roaring Tiger expecting boldness. What I found was something more valuable: restrained power. The description calls it “simple and exquisite,” and that’s spot-on. This isn’t a hyper-detailed wildlife portrait—it’s a confident, stylized machine embroidery design built for recognition at a glance. It reads as modern, not rustic; professional, not cartoonish; fearless, not aggressive. That balance is rare—and essential when your logo needs to live on a barista’s chest pocket *and* a florist’s tote bag.
Where Roaring Tiger Delivers Real Business Value
Embroidered patches are where Roaring Tiger shines brightest. Its clean silhouette, strong outline, and minimal interior detail hold up beautifully at 2”–3” sizes—ideal for sew-on or iron-on application on jackets, uniforms, or boutique packaging. For a local café or creative studio, this patch becomes instant visual shorthand: craft, confidence, and character—all without words.
In custom apparel, Roaring Tiger works exceptionally well as a chest accent on staff polos or aprons. Its vertical orientation and centered roar create natural focal points, especially on dark fabrics like charcoal work shirts or navy denim. On caps? Yes—but best placed on the back strap or side panel rather than the curved front crown unless digitized with advanced underlay (more on that below). As a tote bag design, it anchors the lower corner or center panel with presence—not clutter.
For Etsy sellers and handmade brands, Roaring Tiger adds premium weight to product presentation. Stitched onto linen tea towels, organic cotton totes, or ceramic mug sleeves, it signals intentionality and craftsmanship. It also translates cleanly into printable mockups: its contrast and shape scale reliably across digital assets, helping customers visualize the finished product before purchase.
Use With Intention: Where Caution Applies
While versatile, Roaring Tiger demands thoughtful placement. Avoid using it smaller than 1.5” as an embroidered patch—key features like the open mouth and eye detail may blur or stitch poorly on low-density fabric. Cap fronts require special attention: test the design on a curved surface first. High stitch density in the tiger’s mane or jaw could pucker thin twill unless paired with cutaway stabilizer and reduced fill density.
Dark uniforms? Excellent contrast—if thread colors are chosen deliberately. A rich black tiger on navy fabric reads sharp; the same design in light gray thread would vanish. Always review thread color contrast against your base fabric *before* bulk production. Also, avoid placing Roaring Tiger directly over seams, zippers, or textured surfaces like corduroy or heavy terry cloth—stitch definition suffers, and the design’s clarity weakens.
How It Strengthens Your Brand Identity
Small businesses thrive on memorability—and Roaring Tiger delivers that instantly. Unlike generic script logos or overused icons, it conveys energy and authenticity without sacrificing polish. Customers associate bold, well-executed animal motifs with confidence and care—traits that elevate perceived product value, whether you’re selling sourdough, succulents, or handmade soap.
Consistency matters too. When Roaring Tiger appears identically on aprons, tote bags, and staff caps, it builds visual cohesion across touchpoints. That repetition reinforces trust: customers know they’re engaging with a considered, professional brand—not a one-off craft experiment. For handmade product sellers, it bridges the gap between artisanal warmth and commercial credibility.
Practical Embroidery Designer Notes for Production
Before stitching Roaring Tiger for client work or your own small business merch, follow these field-tested steps:
- Test in black and white first—verify legibility and balance without color distraction.
- Check minimum viable size—stitch a 1.75” version on your target fabric to confirm clarity.
- Review thread color pairings—especially for dark or heathered textiles. Contrast is non-negotiable.
- Inspect spacing and underlay—tight curves around the jaw and ear need proper stabilization to prevent gapping.
- Confirm hoop size compatibility—ensure your embroidery machine’s standard hoop accommodates the full design without re-hooping.
- Test on real fabric—not just stabilizer swatches. Fabric texture dramatically affects stitch lay and density perception.
- Use appropriate stabilizer—cutaway for knits and stretch fabrics; tear-away for stable wovens like canvas or twill.
- Create a printable mockup for client approval—show how Roaring Tiger looks on actual garment photos, not just blank templates.
- Compare alongside other design assets—does it harmonize with your typography, color palette, and existing logos?
- Verify commercial licensing—since this is a digital embroidery file intended for small business use, confirm it permits resale, branded merchandise, and commercial embroidery projects.
Final Thought: More Than a Wild Animal Design
Roaring Tiger belongs in the Wild Animals category—but functionally, it’s a branding tool. It’s not just decoration; it’s a visual anchor for identity, a conversation starter for customers, and a mark of quality for discerning buyers. Whether you run a pet wellness brand, a neighborhood florist, or a screen-print shop expanding into embroidery, this machine embroidery design offers scalable impact without sacrificing artistry. Just remember: simplicity only looks effortless when the digitizing, testing, and execution are deeply intentional. Stitch it right—and let the roar speak for your brand.